Creating Tile Palettes
Before we can paint, we need to create a tile palette, which is made of individual tiles. Go to the menu Window ➤ Tile Palette to show the Tile Palette pane. Dock the Tile Palette pane in the same area as the Inspector. We want our project to stay organized, so create a folder in our Project view under the main Assets folder called “Tile Palettes,” and then create another folder called “Tiles” under the Sprites folder. In the Tiles folder, create two folders called, “Outdoors” and “Objects.”
Painting with Tile Palettes
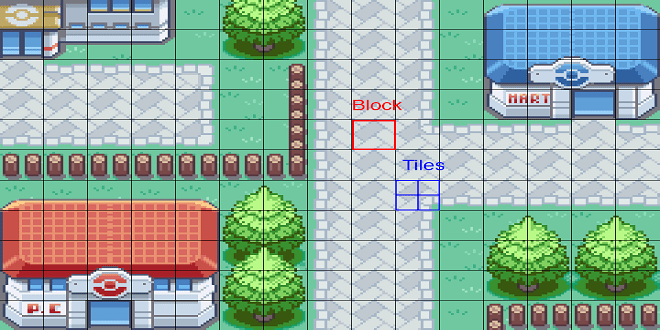
Now comes the fun part: we’re going to use our Tile Palette to paint a Tile map. Select the paintbrush tool from the Tile Palette, and then select a tile from the Tile Palette. Use the paintbrush to paint on the Tilemap in the Scene view. If you make a mistake, you can hold down the Shift key to use the tile paintbrush as an eraser. When the paintbrush is selected, you can hold down Option (Mac)/Alt (PC) + the left mouse button to pan around the Tile map.
Use Option (Mac)/Alt (PC) + left mouse button to pan around the Tile Palette, left-click to select a tile, and left-click and drag to select a group of tiles. If your mouse has a scroll wheel, you can use that to zoom in and out on the Tile Palette, or you can hold down Option / Alt + swipe up/down on a touchpad to zoom in and out. These same keys and gestures will work for the Tile Map as well.
Working with Multiple Tile maps
Let’s get our Tile maps organized. Click on the Tile map object in the Hierarchy view and rename it: “Layer Ground.” We’re going to create multiple Tile maps and stack them on top of each other in layers. Right-click on the Grid object in the Hierarchy view and go to: 2D Object ➤ Tile map to create a new Tile map. Select this new Tile map and rename it: “Layer_Trees_and_Rocks.” As you may have guessed from the name, we’re going to paint trees, bushes, shrubs, and rocks on this Tilemap.
At this point, if you started to paint, you’d notice that have run into the same transparency issue again. There are two things we have to do to fix this issue.
The Camera
All 2D projects in Unity use something called an Orthographic camera. Orthographic cameras render objects that are both near and far, the same size. By rendering all objects the same size, it appears to the onlooker as though everything is the same distance from the camera. This is different from how 3D projects render objects. In 3D projects, objects are rendered with different sizes to give the illusion of distance and perspective. We configured our Unity project to use an Orthographic camera in the very beginning, when we set up a 2D project.
Using Cinema chine
Cinema chine is a powerful suite of Unity tools for procedural in-game cameras, cinematic, and cut scenes. Cinema chine can automate all types of camera movements, blend and cut from camera to camera automatically, and automate all types of complex behaviors, many of them well beyond the scope of this book. We’re going to use Cinema chine to automatically track the player as she walks around the map. Cinema chine was made available through the Asset Store for Unity 2017.1, but starting with Unity 2018.1, Cinema chine was made available through the new Unity Package Manager. Earlier versions of Unity can still use Cinema chine from the Asset Store, but that version is no longer being updated and will contain no new features.
Cinema chine Confiner
Now that we know how to make the camera track the player as they walk around, we’re going to learn how to prevent the camera from moving when the player gets close to the edge of the screen. We’ll use a component called a Cinema chine Confiner to confine the Camera to a certain area. The Cinema chine Confiner will use a Collider 2D object, which we’ve preconfigured to surround the area in which we want to constrain the camera. Before we get into the implementation details, let’s visualize how the Confiner will affect camera movement. Keep in mind that the virtual camera is actually directing the active scene camera, telling it where to move and at what speed.
Summary
In this chapter we’ve covered some core concepts in making 2D games with Unity. We learned how to turn sprites into Tile Palettes and used them to paint Tile maps. We’ve used colliders to prevent the player from walking through objects and how to tweak them for a better player experience. We learned how to configure the Camera to achieve a balance between scaling, art size, and resolution, which is very important in 2D pixel-art style games. One of the most valuable tools we covered in this chapter was Cinema chine—a powerful tool for automating camera movements.